

This is not usual tutorial. You'll find here a lot of phrases "random" or "your choice". I made this quilt spontaneously and I pushed myself to do a lot against my usual habits.
One general advice: while creating this quilt have in mind its name.
It will help you choose the fabrics, put them in right place, choose and put appliqués - everything should be done randomly like you put notes and cards on memory board:)
1. Fabric selection
Pick your 3 favorite colors and try to pull out some fabrics in these colors (as many as you can handle in your hands:) - don't pay attention to the print. I used in this quilt geometric prints (stripes, dots etc.), as well as some florals or novelty. The most important is color - whatever matches your color choices will be perfect!
When I was choosing fabrics I pulled them from my second closet, where I keep fabrics sort out in colors. These fabrics are not used often by me (I use most of the times fabrics which I keep with my sewing machine). When I was going to pull some fabric I use often, I just hold myself not to do this. However I couldn't help myself and I've picked a few (only a few!) of my favorites fabrics.
When you'll be choosing your fabrics try to pull some fabrics perfect for appliqués (round shaped, words, butterflies, small scenes etc.).
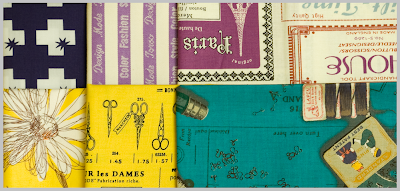
My starter fabrics:
And three color coordinating bundles:


As you can see some of the fabrics have only a little of shade of my colors, some are in a fact multicolored, only a few are real tonal.
Pick also some fabrics in naturals (beige, cream or even brown) or in gray - I've pick this bundle:

For appliqués I've picked bundle of fabrics which putting together in one quilt is out of my usual comfort zone! (but they match in some way to the above fabrics - either color, or print)

Put your fabrics on the floor using the color scheme I've prepared:
(or put it in your own way - you don't have to stick to this color scheme - it's only a guide!)

It's good to stick the rule "dark-light" while putting the fabrics on the floor, but breaking - from time to time - this rule gives a lot of fun and gives the quilt wonderful look.
Look at my floor while I was creating this quilt:
(as you can see I have changed only a little bit this random layout)

2. Cutting and sewing blocks (rows)
This quilt is made from two types of blocks (rectangles and squares) arrange in two kind of rows (Row "A" and Row "B").
Below measurements are for finished quilt size 36' x 44', but if you're planning making bigger quilt, simply add more rows or make rectangles and squares bigger.
I've made this quilt as a wall hanging, because in this way this looks more like memory board (I'm planning also to add some pockets for letters and buttons to hang there keys, because this quilt will be hanging in hall).
Here are the measurements (and schemes of the rows):


Sew the rectangles and squares in rows as shown above.
3. Pressing the seems and piecing the top
I've pressed the seems on one side using the following scheme:
 Please note that seems of the rows meet with each other only in one place - in the middle of the quilt (I've marked it with arrow).
When seems are pressed, you can put the rows together using following scheme:

After sewing the rows together, press the seems (open or on one side) and iron the whole quilt top.
The last part of sewing the top is adding some appliqués - again randomly! Raw edges appliqué or zig zag stitched - your choice.
I used zig zag stitch, because this type of stitches makes wonderful frames which fit perfectly to this quilt.
4. Quilting and binding
Quilting and binding tips will be available when I finish my quilt.
You're very welcome to share your quilting and binding tips!
5. Show and tell:)
If you like this pattern and would like to make Memory Quilt for yourself, I would be really happy to see it! WIP is always nice to watch too:)
I'm really curious what will be your fabrics selection and other "random" and "your choice" stuff:)
Enjoy!


Dzięki za tutorial. Może bym w końcu się ruszyła i coś uszyła, bo mi maszyna się kurzy.
OdpowiedzUsuńPozdrawiam
Magda
Your quilt is beautiful honey! Once I'm through my current WIP list I'm going to give this a try - Thanks fro putting it together :)
OdpowiedzUsuńBeautiful...I pinned this, and I would definitely like to try it in future! Love the idea!
OdpowiedzUsuńWonderful, and I love your tutorial, especially since you spent so much time explaining how to pick the colours which is the hardest part for me. Also, I love your fabrics!
OdpowiedzUsuńJakie kolory , śliczne!! Może się i ja pokuszę o coś w tym typie i spróbuję .
OdpowiedzUsuńLove, Love, LOVE this memory board!
OdpowiedzUsuń