30.5.13

Jelonek / Little deer

One of my favorites swaps is Pillow Talk Swap. I missed out on a few last rounds, but when sign-ups for 10th edition started, I just knew that this time I have to take part. My Partner is someone very special, so I tried to sew pillow one of a kind. I hope that my Partner will love little deer in aqua-pink-red colorway:

/ Jedną z moich ulubionych wymianek jest Pillow Talk Swap. Nie brałam udział w paru ostatnich edycjach, a gdy ogłoszono zapisy na rundę 10tą, wiedziałam, że tym razem muszę wziąć w niej udział. Moja wymianka to ktoś bardzo wyjątkowy, starałam się uszyć poduszkę jedyną w swoim rodzaju. Mam nadzieję, że moja wymianka polubi jelonka w różach, błękicie i czerwieni:


As you can see it's perfect match to the pillow I made for Valentines. I wish I could keep this little deer:)

/ Poducha pasuje idealnie do poduszki, którą uszyłam na Walentynki. Chciałabym zatrzymać u nas tego małego jelonka:)

PS. Thank you all for your sweet comments on my last posts. I'm feeling fine:)

/ PS. Dziękuję za Wasze miłe komentarze pod ostatnim postami. Czuję się dobrze:)

29.5.13

AMH love

I love love love Anna Maria Horner fabrics, so at the end of last year I promised myself that I'll finally dig more into my AMH stash and I immediately started sewing this quilt and patchwork cover for our sofa (it was around December 31:). Just in the middle of works, I lost my faith in this projects and I put it aside. Recently I got back to it and for the second time I had a feeling that it will work... I didn't finish it due to some not-so-serious health problems (the doctor adviced me to relax a lot, no computer, no sewing...). But at least now I'm sure that it will work:) I know extactly what I have to add, but I have no idea when I'll finish recovery. So I wanted to show you at least WIP:

/ Uwielbiam tkaniny zaprojektowane przez Annę Marię Horner. Dlatego też pod koniec ubiegłego roku obiecałam sobie, że w końcu uszyję coś z tkanin, które do tej pory zgromadziłam i od razu wcieliłam plan w życie rozpoczynając szycie tej kołderki i pokrowca na naszą kanapę (to było mniej więcej w Sylwestra:). W połowie prac nad pokrowcem, zwątpiłam, czy uda mi się sprawić by był funkcjonalny i porzuciłam ten projekt. Niedawno wróciłam do niego i po raz drugi uwierzyłam, że może jednak się uda... Niestety nie dokończyłam szycia pokrowca z powodów zdrowotnych (lekarz polecił mi dużo odpoczynku, bez szycia, bez komputera...). Ale przynajmniej jestem teraz pewna, że pokrowiec zda egzamin:) I wiem dokładnie co muszę dodać by tak się stało. Niestety nie wiem, kiedy będę mogła go skończyć, więc już dziś chciałabym pokazać przynajmniej stan prac nad tym projektem:


You can notice some imperfections, but they will dissapear when I topstitch all seams. I plan also to add some batting and quilting to make it more durable (plus I had to add back and finish the bottom parts).
The colorful parts are home decor fabrics designed by AMH (plus some other like Denyse Schmidt and Amy Butler). I used also some heavy weight home-decor fabric from Ikea. Well, actually I use the wrong side of this fabric:))) right side is white with some texture, but I like gray more:)
I would love to buy carpet designed by AMH for my birthday (it would be really early birthday gift since I've got birthday in January:D). This one, this one or maybe this one? Which one of them will be perfect match? I can't decide for about half year now...:)

/ Na pewno zauważycie pewne niedociągnięcia, ale one znikną gdy tylko dodam ścieg stebnowy (tak to się nazywa? Po angielsku "topstitch", a po polsku?). Planuję też dodać w "strategicznych":) miejscach trochę ociepliny i wypikować by pokrowiec był trwalszy (czeka mnie też dodanie tyłu i skończenie dołu - sporo tych wykończeniowych prac).
Oprócz tkanin home decor Anny Marii Horner (i paru innych tkanin różnych projektantów), użyłam tkaniny obiciowej z Ikea. A właściwie jej lewej strony:))) Prawa strona jest biała prążkowana, ale bardziej przypadła mi do gustu jej lewa szara strona:)
Kusi mnie by sprawić sobie wcześniej (o pół roku:D) prezent urodzinowy w postaci dywanu zaprojektowanego przez Annę Marię Horner (tego, a może tego albo tego - jak myślicie, który z nich będzie najlepiej pasował? Ja nie potrafię się zdecydować... od pół roku:).

26.5.13

Summer breeze quilt {Tutorial} and giveaway

Wersja polska już wkrótce:)

Summer Breeze is a fresh quilt with a modern twist. I made it for my daughter's bed, but it could brighten your bed too!
This quilt was made in cooperation with two great artists: Mo Bedell, fabric designer and Krista Withers, modern long-arm quilter (HERE and HERE you can read full story, you'll find there also photos of finished quilt).
Finished size: approx. 59" x 75" (150 cm x 190 cm).

This quilt is at intermediate level for quilters already familiar with sewing curves. If you are new in sewing curves, I recommend piecing first a few blocks to become confident in this technique (when I was new to this technique, at first I find it quite difficult to learn, but after piecing few blocks, I couldn't stop - it was so fun!).
If you have any questions or doubts about this tutorial or used techniques, please don't hesitate to ask me! :)

What you will need?
Half yard* bundle of Full Moon Lagoon by Mo Bedell
2-3 panels (1-2 in magenta and 1 in aqua) from Full Moon Lagoon by Mo Bedell
approx. 1 yard of background fabrics (i.e. Essex linen)
Fabric for backing
Freezing paper
Batting
Rotary cutter and cutting mat
Matching thread
Templates for Drunkard's Path block or Accuquilt GO! cutting machine with Drunkard's Path 3 1/2" finished die

*please note that the amount of fabrics used depends on amount of fussy cuts and the size of the outer border. Half yard bundle let you make the same quilt as mine, but you can use Fat quarter bundle and make some alternations in borders.

Seam allowances
I use 3/8" seam allowances. Most of the quilters use 1/4" seam allowances. The difference between main part pieced using 3/8" s.a. and pieced using 1/4" is approx. 2". Size of finished quilt pieced using 3/8" s.a. is approx. 59" x 75". Quilt made using 1/4" s.a. will be sligthly bigger. For making quilt that measures exactly 59" x 75", measure main part with background border after piecing it and add narrower outer border. 

Things to Remember
Remember to read the tutorial in full before starting.
Pre-wash fabrics.
Always press your fabrics before starting.
Press all seams as you go along.
DP block = Drunkard's Path 3 1/2" finished block

Step 1 - Cutting and piecing main part with Drunkard's Path blocks
The best way of cutting DP blocks is using Accuquilt GO! cutting machine and Drunkard's Path 3 1/2" finished die. You can also make templates by your own and rotary cut DP blocks, but be aware that this quilt contains 131 DP blocks (HERE you'll find the links to tutorials how to make it).

Cut the following amount of DP blocks as indicated on this scheme:


Pieces in two waves are cut from panel in magenta (from the part with medium pink droplets and light pink jellyfish). Some parts could be fussy cut (like seahorses in the wave first from the left).
Cut 10 DP blocks from background fabric.

Sew DP blocks using the following guide:

How to read the above instruction:


After piecing all DP blocks, cut off of each DP block two stripes:


Piece DP blocks into sections B-H using the following schemes:
(some sections contain squares and rectangles cut from background fabric)

Piece sections together:


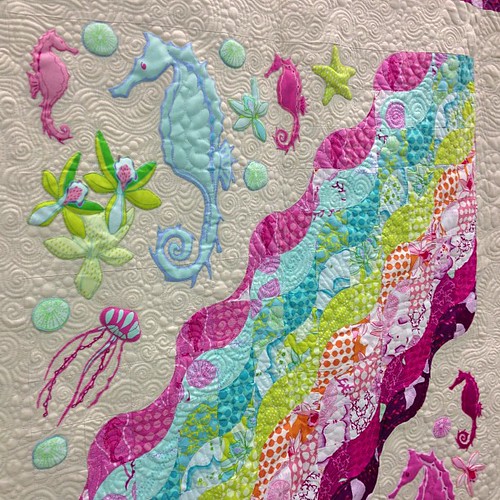
Step 2 - Preparing and sewing on appliques
On the left side of panels trace shapes of seahorses, jellyfish and other sea creatures onto freezing paper. Cut the shapes with a small seam allowance and iron freezing paper shapes onto left side of panels. Cut all shapes with sharp scrissors. Lay them on the background and when you're satisfied with the layout, remove papers and iron shapes onto background. Zig-zag stitch appliques.

Applique layout in Summer Breeze:
(it contains 2 starfish which are not on the panels)


Step 3 - Adding Borders
Piece 4" wide strips of background fabric to top and botom of main part and press the seams. Piece 4" wide strips of background fabric to left and right side of main part and press the seams.
Cut 18" lenght strips with different windths from all fabrics in the collection (4 strips of each print). Some of the strips can contain fussy cut shapes. Sort the strips in "rainbow" order:


Piece strips into borders and press the seams. Piece 18" squares cut from panels to the top and bottom border. Piece left and right border to main part of quilt and press the seams. Piece top and bottom border to main part of quilt and press the seams.

Step 4 - Quilting and binding
Prepare backing (you can use FQ bundle and panels leftovers). Baste it and quilt it (or send it to long-arm quilter, maybe to uber-talented Krista?:). Make binding or use ready made binding. Add label and… enjoy!

Step 5 - Giveaway! giveaway is now closed. Thank you all for your sweet comments! I hope that you'll find time to try piecing curves:)

The winner is... Kerry (@ Penny Dog Patchwork) - I'll contact you asap:)

I thought that it would be fun if I share with one of you bundle of Drunkard's Path blocks die cut from Full Moon Lagoon collection (fabrics have been pre-washed before cutting).
To take part in giveaway, simply leave a comment on this post. It would be great if you could share with me your adventures in sewing curves, quilt market experience (any quilt market, not only the latest) or any other memory relating to patchwork and quilting.

Giveaway is open internationally. I'll pick a winner on next Sunday.
Name of the winner will be announced in this post. I'll contact the winner also via e-mail, so if you're no-reply blogger, please add your e-mail address in the comment.

19.5.13

Jestem w Portland;) / I'm in Portland;)

I'm in Portland... Mainly virtually (by admiring photos from Quilt Market that pop up on Flickr and blogs; I do this during each Quilt Market), but also in some "real" way since my quilt is hanging in Mo Bedell booth (I wrote about our cooperation HERE). I couldn't of course take photos by my own, so I borrowed some from Jenn (she contacted me when she saw my quilt and offered photos - isn't it great?) and one photo from Amanda (she runs great shop on Etsy, you can buy there Full Moon Lagoon bundles).

I must admit that I love this quilt already (although I haven't got it finished in my hands). There are two reasons why I love it: gorgeous fabrics designed by Mo and fabulous quilting by Krista (HERE you can admire more of her works and also contact her if you want Krista to quilt your works). My quilt without these fabrics and mermerizing quilting wouldn't be interesting. Just look at the photos:

/ Jestem w Portland... Głównie wirtualnie (podziwiając zdjęcia z Quilt Marketu, które pojawiają się na Flickr i blogach; takie wycieczki urządzam podczas każdego takiego wydarzenia), ale również nieco realnie, gdyż mój quilt gości w boksie Mo Bedell (o naszej współpracy pisałam więcej TUTAJ). Sama nie mogłam oczywiście zrobić zdjęć, więc pożyczyłam parę od Jenn (która skontaktowała się ze mną sama i zaoferowała pożyczenie fotek) i jedno od Amandy (która prowadzi fajny sklep na Etsy, ma jeszcze na stanie zestawy Full Moon Lagoon).
Muszę przyznać, że już kocham ten quilt (mimo że nie miałam go w rękach skończonego). Są ku temu dwa powodu: wspaniałe tkaniny zaprojektowane przez Mo i przecudowne pikowanie będące dziełem Kristy (TUTAJ znajdziecie więcej jej dzieł, możecie też skontaktować się z nią w sprawie pikowania). Mój quilt bez tych tkanin i hipnotyzujących pikowanek nie byłby ciekawy. Tylko spójrzcie:


(photo by Jenn, SunnyInCAL)
(photo by Jenn, SunnyInCAL)

(photo by Amanda, A Crafty Fox)


And here's Mo (with ribbon award for the best new  exhibitor - congrats!)
/ A oto Mo we własnej osobie (trzyma wstążeczkę za najlepszy boks nowego wystawcy - gratulacje!)


(photo by Jenn, SunnyInCAL)

13.5.13

Kwiat paproci / Fern Flower {Forest QAL}

When we decided with Joanna to run Forest QAL my first thoughts concerned little critters (such as   fox, squirrel) and fern. I thought about fern flower legend (you can find it HERE) and I tried to imagine how such flower could look like. The effect you'll find in the block, you can judge if I make it right:)

/ Gdy wymyśliłyśmy z Joanną Forest QAL na myśl przyszły mi słodkie leśne zwierzęta (takie jak lis, czy wiewiórka) i paproć. Pomyślałam o legendzie o kwiacie paproci (możecie ją przeczytać TUTAJ) i starałam się wyobrazić sobie, jak mógłby taki kwiat wyglądać. Efekt poniżej, oceńcie same, czy sprostałam temu zadaniu:)


Block it's at advanced level due to the amount of small parts. Sewing each piece is not so difficult, but joining the parts together is challenging (I strongly recommend using special paper for paper piecing - I wrote about it HERE). There are only a few points to match. You'll find there also a few singular pieces (O and S). Amy (@ Badskirt) advices to dab a fabric glue to hold the fabric on template in place. Another way of piecing such singular part you'll find HERE

/ Blok jest na poziomie dla zaawansowanych, gdyż zawiera sporo małych części. Szycie poszczególnych części nie jest zbyt trudne, ale połączenie ich w jedną całość stanowi całkiem fajne wyzwanie (użycie specjalnego papieru do szycia pp przy tym bloku jest rekomendowane - pisałam o nim TUTAJ). Blok zawiera niewiele miejsc, które muszą zostać perfekcyjnie zszyte. Zawiera również parę części bez szwów (O i S). Amy (@ Badskirt) radzi by użyć kleju do tkanin by tymczasowo przytrzymać papierek do kształtu wyciętego z tkaniny. Inną metodę szycia takich części pokazałam TUTAJ
Fabric requirements
You'll use FQ for background, F8 for fern leaves and some scraps for flower.
/ Na tło potrzebny jest FQ tkaniny, połówkę FQ na liście paproci oraz skrawki na kwiat.  


Scheme and pdf dowload
Below you'll find the schemes of Fern Flower block (ready block and then sewing scheme). As last time I don't put instruction of the piecing order (last time only one person asked me to send the scheme and when I got back from work, she already finished her block without this scheme:), but if you need it, just send me e-mail.

/ Poniżej zamieszczam schematy (pierwszy to schemat obrazujący blok po zszyciu, a drugi instrukcja zszywania poszczególnych części). Tak jak ostatnim razem, nie umieściłam schematu wskazującego na kolejność zszywania poszczególnych części (ostatnio tylko jedna osoba o taki poprosiła, ale zanim zdążyłam go wysłać, uszyła cały blok bez korzystania z tego schematu:), ale jeśli potrzebujecie takowego, napiszcie do mnie e-maila.


You can download pdf copy with templates HERE (Google Docs) and HERE (Craftsy).
Please make sure you print it at 100% scale (there's 1" square to check if the printed copy is ok).

I heard from quilters that there are no problems with downloading patterns from Craftsy, but if you can't print it, just e-mail me at jednoiglec [at] wp [dot] pl and I'll send you a pdf copy.

/ Można ściągnąć gotowe "papierki" do szycia TUTAJ (Google Docs) i TUTAJ (Craftsy).
Drukarka powinna być ustawiona na 100%. Na dokumencie jest kwadrat kontrolny 1 cal (ok. 2,54 cm).

Ponoć bez problemu można ściągnąć papierki z Craftsy, ale jeśli będziesz mieć z tym problem, napisz do mnie e-maila na adres jednoiglec [małpa] wp [kropka] pl, a ja prześlę Ci pdf.


Don't forget to share your block at our Flickr group! :)
/ Nie zapomnijcie pochwalić się uszytym blokiem w naszej Flickr-kowej grupie:)

6.5.13

Retro Rose for contest

Did you read about the Briar Rose Quilt Design Contest? It's a collaboration of Pink Castle Fabrics, Windham Fabrics and Threadbias, Heather Ross itself is a judge. I read about it some time ago, but then I thought that I won't be able to learn the new quilt design tool by Threadbias. On Saturday I read that the deadline for submitting contest entries ends soon, so without any futher hesitation I decided to give it a try. And it was easier than I thought! The Threadbias tool is so easy to use and it contains special options for creating my favorite Drunkard's Path blocks. So please meet my entry Retro Rose:

/ Miałyście może już okazję przeczytać o konkursie Briar Rose Quilt Design? Konkurs jest pomysłem Pink Castle Fabrics, Windham Fabrics i Threadbias, Heather Ross we własnej osobie jest sędzią. Czytałam o tym konkursie jakiś czas temu, ale byłam przekonana, że nie nauczę się jak obsługiwać narzędzie do projektowania quiltów udostępnione przez Threadbias. W sobotę znów natknęłam się na informację o konkursie, który dobiegał już końca, i bez dalszego wahania, postanowiłam spróbować. Okazało się, że obsługa programu jest o wiele prostsza niż myślałam! Narzędzie udostępnione przez Threadbias jest bardzo intuicyjne, a do tego zawiera specjalne opcje do kreowania moich ulubionych bloków Drunkard's Path. Tak też powstał projekt Retro Rose:


If you like my Retro Rose, you can vote for it HERE.
You have to be a member of Threadbias community to vote. Signing up is free and you can try (also for free) how quilt design tool works:)

/ Jeśli Wam się podoba mój projekt, możecie na niego głosować TUTAJ.
Trzeba być członkiem społeczności Threadbias by zagłosować, ale dołączenie do niej jest bezpłatne i daje możliwość wypróbowania narzędzia do projektowania quiltów (również bezpłatnie:)